Today, Amir Helzer from WPML (WordPress Multilingual) shares his experience building a custom WordPress theme.
In my previous post, I talked about what I do when commissioning custom WordPress theme design. It left where the job started. In this post, I’ll talk about the steps that follow - working with the designer towards a complete and functional theme, reviewing it and finalizing the project.
Reviewing prototypes
The first thing the designer needs to send me are prototypes of the website. These are non-functional documents (images). The designer isn’t creating a real web page for that, but rather using a drawing tool. Prototyping is a creative process. It’s when the web designer’s creative abilities get to shine.
Let the designer design, don’t do a review by committee
If you were a graphics designer, you’d have probably built your theme yourself. You’re probably not, so you asked a professional designer to help. The problem is, people don’t know how to review what they get so we start asking for feedback from others. The wife, our friends and colleagues all have something to say. Then, we compile that ‘rejects list’ and send to the designer. What we’ve done right now is make sure the designer can’t do anything.
Graphics design is a creative process and produces subjective results. Any given design will always generate criticism. If our objective is to come up with a design that makes everyone happy, we’ll end up with a pale design that has no character and no impact. Our site will not be memorable and will have no branding.
My suggestion is - leave the creative work to the designer and concentrate my efforts on functionality.
For WPML, these are the issues I raised during the prototyping stage:
- Make the top banner smaller and consume less page real estate.
- Make the text background white so it’s easier to read.
- Add a search box and language selector and integrate them in the top banner.
- Make the screen shots in the features page larger.
Create a detailed theme checklist
As the designer is building your theme, take the time to compile a comprehensive checklist of items you’re going to check. When get the first delivery, it’s like a new toy. You’ll want to play with it and show it around. It will be very helpful if you have a checklist to go through for each delivery, so nothing gets left out.
Here is my list:
- All pages are HTML clean. To verify this, I review the theme in Firefox and use the HTML Validator extension. It displays the validation status of every page viewed so you can tell right away where there’s a problem.
- Pages look the same in Firefox and IE7. Even if all pages are 100% HTML valid, they might display differently in different browsers (due to different CSS defaults).
Check the home page (if it’s a the blog’s index or if it’s a special page). - Check samples of different templates (check for both enabled and disabled comments).
- Check a post with and without comments.
- Check a category page.
- Check a tag page.
- Check the search results page (and make sure that the search box is placed where it should).
- Sidebar supports widgets.
- Comments are threaded and properly coded (when I click on ‘reply to comment, the JS kicks in and the reply box is displayed under the comment).
- Use the site navigation and see that I can get to any page.
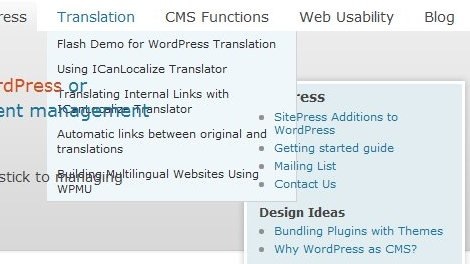
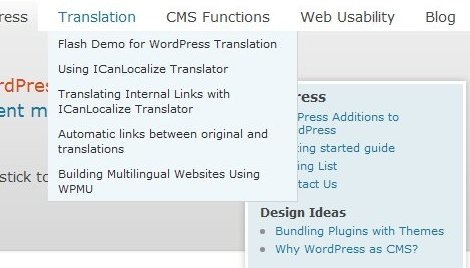
Just to illustrate what I mean by testing on different browsers, have a look at these two screen shots:

Menu problem on IE7 - incorrect Z order of floating menu

After correcting the Z-order - menus display correctly on IE7 and FF
These two shots were taken from a page that is 100% valid XHTML. No errors and no warnings. Still you can see that the navigation is completely broken on the top image and looks fine on the bottom one. This happened due to a weird IE7 bug which mixes z-order for elements if a page has more than one relative position blocks.
When the designer is ready with a new version the the theme, I review it in two stages. First on their server and then on my. If there are obvious errors, I like to see them immediately on their server before spending time uploading and installing it on my.
Logo graphics
An important part of the design is the logo. The logo that comes with the theme is great, but you also need to use it in other places. I use my logo graphics for business cards, banner ads and even in plugins. For this to work, you need to request the logo in a way that is independent of the rest of the theme design. I ask for the graphics as a high resolution transparent PNG (Portable Network Graphics).
 Then, when the designer sends me the logo, I put it on different backgrounds and magnify. This way, any artifacts are easier to spot. For starters, try while, black and red. If your transparent logo shows strange edges, it means that the transparency isn’t right and it needs fixing.
My logo includes the graphics itself and some text. I ask to get them separately, so that I can use either one or the other. Also remember to take note of the font type used in your logo. You’ll need that when creating printed material with it.
Wrap up
A custom theme for your blog will give it an identity. Like any other design project, it has its risks. When defined and managed properly, this can be a fun thing to do and produce excellent results that will bring your blog to the next level.
I hope that these tips help. Tell us about your experience getting custom design work.
1 comment:
Firstly thanks a lot for such a wonderful post. I would like to know more about such topics and hope to get some more helpful information from your blog. C U soon.
custom wordpress theme
Post a Comment